Standard Menus
Most applications have many functions in common, such as , , and . To aid learning and memorability, these menu items, and the menus on which they appear, must appear with the same labels and in the same order in every application. The same commands must also behave the same way in different applications, to avoid surprising the user.
This section details the most common menus, menu items and their behaviors. You will not need all of these menus or menu items in every application you write, but do preserve the order of the menu titles and of the menu items that you do use.
- Place application-specific menus after the menu and before the menu
- Place application-specific menu items towards the middle of a standard menu, unless they logically fit with one of the standard groups already on the menu.

4.4.1. File
The menu contains commands that operate on the current document. It is the left-most item in the menubar because of its importance and frequency of use, and because it is a relevant menu in many applications. Historically, because most applications already had this menu, and because the distinction between closing documents and closing windows became blurred over time, the menu has also become the standard location for .
The items on the menu are generally ordered by locality, closest first. That is, items to save or load from file, followed by printing, followed by sending to a remote user. Try to maintain this ordering if you have to add new items to the menu.
If your application does not operate on documents, name this item for the type of object it displays. For example, many games should have a instead of a menu. However, place the menu item last on this menu nonetheless.
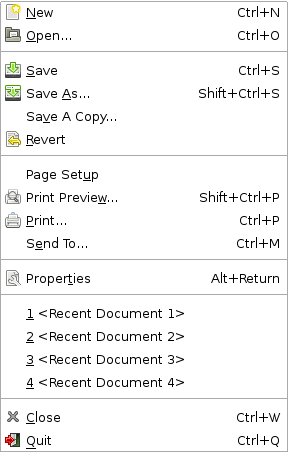
- 4.4.1.1. Creation and Opening Operations
- 4.4.1.2. Saved State Operations
- 4.4.1.3. Export Operations
- 4.4.1.4. File Properties
- 4.4.1.5. Closing Operations
4.4.1.1. Creation and Opening Operations
| Label | Shortcut | Description |
|---|---|---|
| Ctrl+N | Creates a new document. Open a new primary window, with the title Document name, containing a blank document. How this window is displayed, e.g. as a tab or a separate window, is up to the window manager.
If your application can create a number of different types of document, you can make the item a submenu, containing a menu item for each type. Label these items , make the first entry in the submenu the most commonly used document type, and give it the Ctrl+N shortcut. Note: A blank document will not necessarily be completely blank. For example, a document created from a template may already contain some data. |
|
| Ctrl+O | Opens an existing document in a new window. Present the user with a standard Open File dialog from which they can choose an existing file. If the chosen file is already open in the application, raise that window instead of opening a new one. |
4.4.1.2. Saved State Operations
| Label | Shortcut | Description |
|---|---|---|
| Ctrl+S | Saves the document with its current filename. If the document already has a filename associated with it, save the document immediately without any further interaction from the user. If there are any additional options involved in saving a file (eg. DOS or UNIX-style line endings in a text file), prompt for these first time the document is saved, but subsequently use the same values each time until the user changes them. If the document has no current filename or is read-only, selecting this item should be the same as selecting . | |
| Shift+Ctrl+S | Saves the document with a new filename. Present the user with the standard Save As dialog, and save the file with the chosen file name. | |
| None | Prompts the user to enter a filename, with which a copy of the document is then saved. Do not alter either the view or the filename of the original document. All subsequent changes are still made to the original document until the user specifies otherwise, for example by choosing the command.
Like the dialog, the dialog may present different ways to save the data. For example, an image may be saved in a native format or as a PNG. |
|
| None | Reverts the document to the last saved state. Present the user with a warning that all changes will be lost, and offer the option of cancelling before reloading the file. | |
| None | An alternative to the command. Only use this item in conjunction with the . command. | |
| None | Prompts the user for a version of the current document to be restored. Present the user with with a warning that all changes will be lost, and offer the option of cancelling before restoring the version. Only use this item in conjunction with the command. | |
| None | An alternative to the and commands. Use this when more utilities, such as a diff, are available. |
4.4.1.3. Export Operations
| Label | Shortcut | Description |
|---|---|---|
| None | Allows the user to control print-related settings. Present the user with a dialog allowing the user to set such options as portrait or landscape format, margins, and so on. | |
| Shift+Ctrl+P | Shows the user what the printed document will look like. Present a new window containing an accruate represenation of the appearance of the document as it would be printed. The libgnomeprintui library provides a standard Print Preview window that you should use if possible. | |
| Ctrl+P | Prints the current document. Present the user with a dialog allowing them to set options like the page range to be printed, the printer to be used, and so on. The dialog must contain a button labelled that starts printing and closes the dialog. The libgnomeprintui library provides a standard Print dialog that you should use if possible. | |
| Ctrl+M | Provides the user a means to attach or send the current document as an email or email attachment, depending on its format. You may provide more than one item depending on which options are available. If there are more than two such items, move them into a submenu. For example, if only and are available, leave them on the top-level menu If there is a third option, such as , place all the options in a submenu. |
4.4.1.4. File Properties
| Label | Shortcut | Description |
|---|---|---|
| Alt+Return | Opens the document's Properties window. This may contain editable information, such as the document author's name, or read-only information, such as the number of words in the document, or a combination of both. The Alt+Return shortcut should not be provided where Return is most frequently used to insert a new line. |
4.4.1.5. Closing Operations
| Label | Shortcut | Description |
|---|---|---|
| Ctrl+W | Closes the current document. If it has unsaved changes, present the user with a confirmation alert giving the option to save changes, discard them, or cancel the action without closing or saving the document.
If the window you are closing is the last open document in the application, the correct action depends on your application type:
|
|
| Ctrl+Q |
Closes the application. If there are unsaved changes in any open documents, present the user with a confirmation alert for each affected document, giving the option to save the changes, discard them, or cancel. If there are no unsaved changes, close the application immediately without presenting any further messages or dialogs. In particular, non-document based applications, for example a game or a calculator, should save their state and exit immediately. This state should be restored the next time the application is started. |
4.4.2. Edit
The menu contains items relating to editing both the document (clipboard handling, search and replace, and inserting special objects) and the user's preferences. Preferences are edited here rather than on a menu, because:
- most applications' preferences windows are accessed via a single menu item, and single-item menus offer poor usability
- most applications already contain a suitable menu.
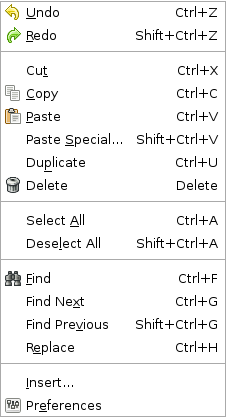
- 4.4.2.1. Modification History
- 4.4.2.2. Manipulating Selected Data
- 4.4.2.3. Searching and Replacing
- 4.4.2.4. Inserting Special Objects
- 4.4.2.5. User Preferences
4.4.2.1. Modification History
Document-based applications should maintain a history of modifications to a document and the state of the document between each action. The and commands move backwards and forwards through this history.
| Label | Shortcut | Description |
|---|---|---|
| Ctrl+Z | Undoes the effect of the previous action in the undo history list. Revert the document to its state before the previous action was performed. If your application supports undo, and the user undoes all changes since it was last saved, treat the document as unmodified. Note: provide a separate and menu item even if your application only supports one level of undo. | |
| Shift+Ctrl+Z | Performs the next action in the undo history list, after the user has moved backwards through the list with the command. Move the user one step forwards again, restoring the document to the state it was in after that action was originally performed.
Note: provide a separate and menu item even if your application only supports one level of undo. |
4.4.2.2. Manipulating Selected Data
| Label | Shortcut | Description |
|---|---|---|
| Ctrl+X | Removes the selected content and places it onto the clipboard. Visually, remove the content from the document in the same manner as . | |
| Ctrl+C | Copies the selected content onto the clipboard. | |
| Ctrl+V | Inserts the contents of the clipboard into the document. If there is no current selection, use the caret as the insertion point. If there is a current selection, replace it with the clipboard contents. | |
| Shift+Ctrl+V | Inserts a non-default representation of the clipboard contents into the document. Open a dialog presenting a list of the available formats from which the user can select. For example, if the clipboard contains a PNG file copied from a file manager, the image may be embedded in the document, or a link to the file inserted so that changes to the image on disk are always reflected in the document. | |
| Ctrl+U | Creates a duplicate copy of the selected object. Do not prompt for a name for the duplicate object, but give it a sensible default (for example, Copy of ShoppingList.abw) and allow the user to change it later. Place the duplicate copy as near the original as possible without overlapping it, even if this means breaking the current sort order within the container, so the user sees it immediately. | |
| Delete | Removes the selected content without placing it on the clipboard. | |
| Ctrl+A | Selects all content in the current document. | |
| Shift+Ctrl+A | Deselects all content in the current document. Only provide this item in situations when no other method of undoing selection is possible or apparent to the user. For example, in complex graphics applications where selection and deselection is not usually possible simply by using the cursor keys. Note: Do not provide in text entry fields, as Shift+Ctrl+hex digit is used to enter unicode characters so its shortcut will not work. |
4.4.2.3. Searching and Replacing
| Label | Shortcut | Description |
|---|---|---|
| Find... | Ctrl+F | Opens a window or dialog allowing the user to search for specific content in the current document. Highlight each match in-place. If the command allows the user to search for content in places other than the current document, for example other open documents, other documents on disk, or a remote network location, label this item instead of . |
| Ctrl+G | Selects the next instance of the last Find term in the current document. | |
| Shift+Ctrl+G | Selects the previous instance of the last Find term in the current document. | |
| Ctrl+H | Opens a window or dialog allowing the user to search for specific content in the current document, and replace each occurrence with new content. |
4.4.2.4. Inserting Special Objects
Where applicable, provide items on the menu that insert special objects such as images, links, GUI controls or the current date and time.
If you have up to three types of object that can be inserted, add them as individual items to this menu, for example , or . If you have between three and six types, place them on an submenu. If you have more than six, add a separate menu to the menubar.
4.4.2.5. User Preferences
| Label | Shortcut | Description |
|---|---|---|
| None | Opens a preferences window allowing the user to change preferences for the whole application. Changes will apply to all running and subsequent instances of the application. |
4.4.3. View
The menu contains only items that affect the user's view of the current document. Do not place any items on the menu that affect the the content of the current document. (Exception: may change the current contents if, for example, the document is a webpage that has been recently updated on the server).
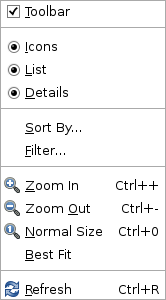
- 4.4.3.1. Toolbar and Statusbar
- 4.4.3.2. Content Presentation
4.4.3.1. Toolbar and Statusbar
| Label | Shortcut | Description |
|---|---|---|
| None | Shows or hides the application's toolbar. This is a check box menu item. Include this item in every application that has a single toolbar. See Section 5.2 ― Controlling Display and Appearance for information on how to deal with multiple toolbars. |
4.4.3.2. Content Presentation
| Label | Shortcut | Description |
|---|---|---|
| None | Shows the contents of the selected container as rows and columns of large icons, each with its name underneath. This is a radio button menu item. | |
| None | Shows the contents of the selected container as a list of small icons, possibly in multiple columns, each with its name on its right-hand side. This is a radio button menu item. | |
| None | Shows the contents of the selected container as single column of small icons, each with its name on its right-hand side. Additional columns give extra information about the object each icon represents, for example the size and modification date of files in a file manager. This is a radio button menu item.
If your application has no need for both and modes, use the item for whichever of the two modes you support. |
|
| None | Sorts the contents of an container by user-specified criteria. Open a dialog allowing the user to choose from pre-defined sort keys (for example, Name, Size, or Modification Date in a file manager), or to specify their own if applicable. | |
| None | Hides objects that are not of interest to the user. Open a dialog allowing the user to choose from a list of types of object they want to display, or to enter their own criteria (for example, a regular expression matched against a particular property of the objects). | |
| Ctrl++ | Zooms into the document. Make the center of the new view the same as the center of the previous view. | |
| Ctrl+- | Zooms out of the document. Make the center of the new view the same as the center of the previous view. | |
| Ctrl+0 | Resets the zoom level back to the default value, normally 100%. Make the center of the new view the same as the center of the previous view. | |
| None | Makes the document fill the window. Show the document, or the current page of the document, at as high a zoom level as will fit in the window whilst allowing the whole document or page to be visible without scrolling. | |
| Ctrl+R | Redraws the current view of the document from local storage. For example, in a web browser application, this would redraw the page from the browser page cache. | |
| Ctrl+R | Redraws the current view of the document, checking the data source for changes first. For example, checks the web server for updates to the page before redrawing it. If your application requires both and , use Shift+Ctrl+R as the shortcut for . |
4.4.4. Insert
The menu lists the type of special objects that can be inserted into the document at the current caret position, for example images, links, page breaks or GUI objects. Only provide this menu if you have more than about six types of object that can be inserted, otherwise place individual items for each type on the menu.
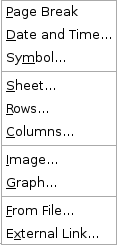
The types of object will vary between applications, but the table below shows some common types that may be applicable.
| Label | Shortcut | Description |
|---|---|---|
| None | Inserts a page break at the caret position. Show the page break visually, for example as a dotted line across the page, unless the user has specifically requested not to see them. | |
| None | Inserts the current date and/or time at the caret position. Open a dialog giving a choice of date and time formats. If applicable, also offer the choice to insert either as plain text, so the specified date and time will always appear in the document, or as a special field that will updated every time the document is opened, refreshed or printed. | |
| None | Inserts a special symbol, such as a mathematical symbol or foreign character, at the caret position. Open a dialog showing all the available symbols as a table, from which the user can choose. The user must be able to add multiple symbols to the document at one time without having to close and re-open the dialog. | |
| None | Adds a new sheet to the current workbook. Do not prompt for a name, but choose a sensible default (such as Sheet-2) and allow the user to change it later. | |
| None | Adds new rows to a table in which one or more rows or cells are currently selected. Open a dialog asking whether to insert rows above or below the current selection, and for any other required information. Copy the row format from the last or first row of the current selection respectively, unless the user specifies otherwise. | |
| None | Adds new columns to a table in which one or more columns or cells are currently selected. Open a dialog asking whether to insert columns to the left or right of the current selection, and for any other required information. Copy the column format from the right- or left-most column of the current selection respectively, unless the user specifies otherwise. | |
| None | Inserts an image into the document from a file. Present a standard Open File dialog filtered on acceptable file types, from which the user can choose an image file to insert. | |
| None | Inserts a graph into the document. Open a dialog or assistant that allows the user to build (or open from a file) a graph of their choice, using the current selection as an indication of which values, axis labels and data labels to use. | |
| None | Inserts an object from any acceptable file type, for example plain text, formatted text, or an image. Present a standard Open File dialog filtered on acceptable file types, from which the user can choose a file to insert. | |
| None | Inserts a link to an object stored in a different file, or on a remote system. The object is not embedded in or saved with the document, only a link to it. Open a dialog in which the user can type or choose the name of the object, for example a filename or a webpage URL. Show the link in the document in as informative way as possible. For example, show a link to an image as a thumbnail of that image, unless the user specifies otherwise. |
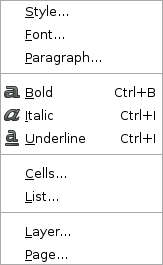
4.4.5. Format
A menu contains commands to change the visual appearance of the document. For example, changing the font, color, or line spacing of a text selection.
The difference between these commands and those on the menu is that changes made with Format commands are persistent and saved as part of the document, for example as HTML or RTF tags.
Items found on the will be very application-specific, but some common items are listed in the table below.
| Label | Shortcut | Description |
|---|---|---|
| None | Sets the style attributes of the selected text or objects either individually or to a named, predefined style. Open a dialog allowing the user to set attributes such as bold, italic, size and spacing individually, and to create their own named styles where applicable. | |
| None | Sets the font properties of the selected text or objects. Open a dialog allowing the user to choose font, size, style, color, or whatever other attributes are applicable. | |
| None | Sets the properties of the selected paragraph. Open a dialog allowing the user to choose style, line spacing, tabulation, or whatever other attributes are applicable. | |
| Ctrl+B | Toggles the boldness of the current text selection on or off. If some of the selection is currently bold and some is not, this command should bolden the selected text. | |
| Ctrl+I | Toggles the italicisation of the current text selection on or off. If some of the selection is currently italicised and some is not, this command should italicise the selected text. | |
| Ctrl+U | Toggles underlining of the current text selection. If some of the selection is currently underlined and some is not, this command should underline the selected text. | |
| None | Sets the properties of the selected table cells. Open a dialog allowing the user to choose alignment, borders, shading, text style, number format, or whatever other attributes are applicable. | |
| None | Sets the properties of the selected list, or turns the selected paragraphs into a list if they are not already formatted as such. Open a dialog allowing the user to choose number or bullet style, spacing, tabulation, or whatever other attributes are applicable. | |
| None | Sets the properties of all or selected layers of a multi-layered document. Open a dialog allowing the user to choose name, size, visibility, opacity, z-ordering, or whatever other attributes are applicable. | |
| None | Sets the properties of all or selected pages of the document. Open a dialog allowing the user to choose paper size, orientation, columns, margins, or whatever other attributes are applicable. |
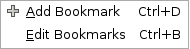
4.4.6. Bookmarks
Provide a menu in any application that allows the user to browse files and folders, help documents, web pages or any other large information space.
Show icons for bookmark entries on the Bookmarks menu that indicate the type of the bookmark, even if the user has globally turned off icons for other menu items on the desktop.
| Label | Shortcut | Description |
|---|---|---|
| Ctrl+D | Adds a bookmark for the current document to the default bookmark list. Do not pop up a dialog asking for a title or location for the bookmark, instead choose sensible defaults (such as the document's title or filename as the bookmark name) and allow the user to change them later using the feature. | |
| Ctrl+B | Allows the user to edit the application's bookmark list. Open a window in which the user can arrange bookmarks into a hierarchy, move, copy, and delete bookmarks, and change their properties. | |
| Bookmark List | None | The user's current list of bookmarks for the application. |
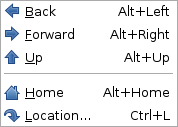
4.4.7. Go
A menu provides commands for quickly navigating around a document or collection of documents, or an information space such as a directory structure or the web.
The contents of the menu will vary depending on the type of application. Different standard menus are presented here for browser-based and document-based applications , but your application may require a combination of both.
| Label | Shortcut | Description |
|---|---|---|
| Alt+Left | Navigates to the previous document in the browser's history list. | |
| Alt+Right | Navigates to the next document in the browser's history list. | |
| Alt+Up | Navigates to the current document's (or folder's) parent document (or folder). For a document browser, such as an online help viewer, this usually means navigating to the enclosing sub-section, section, chapter or contents page. | |
| Alt+Home | Navigates to a starting page defined by the user or the application. | |
| Ctrl+L | Navigates to a user-specified URI. Open a dialog into which the user can type a suitable URI, or select one from a list where applicable (for example, a file selection dialog for applications that can handle file:// URIs). |
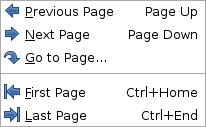
| Label | Shortcut | Description |
|---|---|---|
| PageUp | Navigates to the previous page in the document. | |
| PageDown | Navigates to the next page in the document. | |
| None | Navigates to a user-specified page number. Open a dialog into which the user can type a page number. Text-based applications may also include a menu item, which allows the user to jump to a specified line number. | |
| Ctrl+Home | Navigates to the first page in the document. | |
| Ctrl+End | Navigates to the last page in the document. |
4.4.8. Windows
The Windows menu contains commands that apply to all of the application's open windows. Only use a Windows menu in multiple document interface (MDI) applications.
The use of MDI is discouraged, as they have a number of inherent usability problems.
You may also label this menu , , or similar according to the type of document handled by your application.
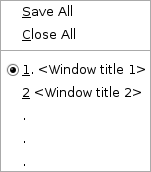
The last items on this menu are a numbered list of the application's primary windows, for example . Selecting one of these items raises the corresponding window.
| Label | Shortcut | Description |
|---|---|---|
| None | Saves all open documents. If any documents have no current filename, prompt for a filename for each one in turn using the standard Save dialog. | |
| None | Closes all open documents. If there are any unsaved changes in any documents, post a confirmation alert for each one in turn. | |
|
etc. |
None | Raises the corresponding window to the top of the window stack. |
4.4.9. Help
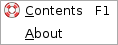
The menu provides access to all online documentation for your application. This includes both the user guide, and the window which includes a brief description of your application's functionality.
| Label | Shortcut | Description |
|---|---|---|
| F1 | Opens the default help browser on the contents page for the application. | |
| None | Opens the About dialog for the application. Use the standard dialog provided by the GNOME libraries, which contains the name and version number of the application, a short description of the application's functionality, author contact details, copyright message and a pointer to the licence under which the application is made available. |