Mouse Interaction
- 10.1.1. Buttons
- 10.1.2. Selecting Objects
- 10.1.3. Drag and Drop
- 10.1.4. Mouse Interaction with Panel Applications (Applets)
10.1.1. Buttons

For most users, the mouse provides the main way of interacting with graphical user interfaces. The term "mouse" is used in this chapter to include other pointing devices that can be used to move the pointer around the screen, such as trackballs, trackpads, spaceballs, graphics tablets, or assistive technology devices that emulate a mouse.
For right-handed users, the left button on a conventional mouse is used for the majority of mouse actions. We therefore call it the here, even though that may not physically be the case. For this reason, you may sometimes see this button referred to in code or documentation as "Button 1" or the "Selection Button".
Similarly for right-handed users, the right button on a conventional mouse is used for operations involving pop-up menus. We therefore call it the in this chapter. You may sometimes see this button referred to in code or documentation as "Button 3" or the "Menu Button".
A conventional mouse with three buttons normally has its third button (or a scrollwheel that acts as a button when pushed) between the left and right buttons. We therefore call it the , but you may sometimes see this referred to in code or documentation as "Button 2" or the "Transfer Button".
Your application uses left button gestures for selecting, activating components, dragging, and the display of drop-down menus.
Your application uses right button gestures to display and select actions from a popup menu.
-
Your application uses the middle button to paste the current PRIMARY (usually the last-highlighted) selection at the pointer position, as follows:
Table 10-1 Effect of modifier keys on a transfer operationModifier Function Unmodified Copy selection Ctrl Copy selection Shift Move selection Shift+Ctrl Create link, shortcut or alias to selection Do not over-ride this functionality in any part of your user interface where the transfer action is likely to be useful. If you do intend to use the middle button for a different purpose somewhere, only do so as a shortcut for experienced users, and only for operations that can also be performed without using the or .
If present on the mouse, the scrollwheel should scroll the window or control under the pointer, if it supports scrolling. Initiating scrolling in this way should not move keyboard focus to the window or control being scrolled.
Ctrl+ should zoom into the window or control under the mouse pointer, and Ctrl+ should zoom out. Zooming in this way should not move keyboard focus to the window or control being zoomed.
Do not depend on input from the middle or right mouse buttons. As well as being physically more difficult to click, some pointing devices and many assistive technology devices only support or emulate the left mouse button. Some assistive technologies may noteven emulate the mouse at all, but generate keyboard events instead.
Ensure that every operation in your application that can be done with the mouse can also be done with the keyboard. The only exceptions to this are actions where fine motor control is an essential part of the task. For example, controlling movement in some types of action games, or freehand painting in an image-editing application.
Do not warp the mouse pointer, or restrict mouse movement to part of the screen. This can interfere with assistive technologies, and is usually confusing even for users who do not rely on assistive technologies.
Do not require the use of chording (pressing multiple mouse buttons simultaneously) for any operations.
Do not require the use of multiple (triple- or quadruple-) clicking actions for any operations, unless you also provide an accessible alternative method of performing the same action.
Allow all mouse operations to be cancelled before their completion. Pressing the Esc key should cancel any mouse operation in progress, such as dragging and dropping a file in a file manager, or drawing a shape in a drawing application.
Do not assign any actions exclusively to the middle button of a three-button mouse, as not all mice have one.
Do not hard-code mouse target sizes, or make them too small. Define any mouse targets to be at least as large as the arrow button in a GtkSpinBox in the current gtk theme. Bear in mind that a user with impaired dexterity or vision may be using a theme that results in considerably larger widgets than the default theme.
Do not refer to particular mouse buttons in your interface unless absolutely necessary. Not everybody will be using a conventional mouse with left, middle and right buttons, so any text or diagrams that refer to those may be confusing.
10.1.2. Selecting Objects
- 10.1.2.1. Mouse and keyboard equivalents
- 10.1.2.2. Bounding Box Selection
10.1.2.1. Mouse and keyboard equivalents
For controls or windows that contain a number of objects that the user can select, either singly or multiply, ensure the following mechanisms are in place to allow selections to be made using either the mouse or the keyboard.
| Mouse | Keyboard | |
|---|---|---|
| Select item, deselect all others | Click | Space |
| Add/remove item from selection | Ctrl click (toggles item's selected state) | Ctrl+Space (toggles focused item's selected state) |
| Extend selection | Shift click | Shift+Space, Shift+Home, Shift+End, Shift+PageUp, or Shift+PageDown |
| Move focus | Click appropriate item to select it | Cursor keys, Home, End, PageUp, and PageDown move focus and selection simultaneously.
Ctrl+cursor keys, Ctrl+Home,Ctrl+End, Ctrl+PageUp, and Ctrl+PageDown move focus without affecting current selection. |
| Select All | Click first item, then Shift click last item | Ctrl+A |
| Deselect All | Click container background | Shift+Ctrl+A |
| Activate selection | Double-click to activate a single selection. Shift or Ctrl double-clicking extends or adds item to selection first before activating the entire selection. | Return activates entire selection. If nothing is currently selected, selects currently-focused item first. |
| Invert Selection | No mouse equivalent | Ctrl+I |
10.1.2.2. Bounding Box Selection
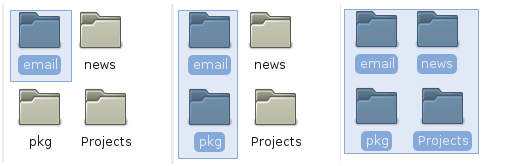
For a container whose objects may be arranged in two dimensions, for example the icon view in a file manager, allow multiple selection by dragging a bounding box (sometimes called a "rubber band") around one or more objects. Shift + drag should add all the objects within the bounding box to the existing selection. Ctrl + drag should toggle the selected state of all the objects within the bounding box.
-
Allow a bounding box selection to begin only if the initial mouse button press is made:
- Within the bounds of the container's background, and
- outside the bounds of any another object in the same container that can be dragged.
In a drawing application, for example, this means that a bounding box click and drag could start on a blank area of the canvas, or within a shape that had been locked down to prevent accidental editing, but not in an active shape which would itself be dragged instead.
Select any objects that lie wholly or partly within the bounding box when the mouse button is released.
Use dynamic highlighting during the drag to show which objects will be selected. Do not wait until the mouse button is released. This avoids any uncertainty about which objects will be selected by the bounding box.
When a bounding box is being dragged out within a scrollable window, support automatic scrolling of that window when the box is dragged near the window's edges.
10.1.3. Drag and Drop
Drag and drop is a direct manipulation technique, where you perform actions on selected objects by moving them around the screen with the mouse. You "drag" an object by clicking it, then holding the button while you move the pointer to the object's target location. The object is "dropped" at that location by releasing the mouse button.
-
Use drag and drop only where the user can reasonably guess what the effect might be. The most common uses are:
- to move or copy objects from one place to another
- to link one object to another
- to perform an action on the objects by dropping them onto an icon representing that action, such as a trash can or printer icon.
Provide visual feedback throughout a drag and drop operation. Highlight valid targets and change the mouse pointer as it passes over them. Use the "no drop" mouse pointer when passing over invalid drop targets. See also Section 10.1.3.2 ― Mouse Pointers to Use for Drag and Drop.
-
Augment the mouse pointer with a representation of the objects being dragged. Keep this representation small or make it translucent, so as not to obscure possible drop targets underneath it. See also Section 10.1.3.2 ― Mouse Pointers to Use for Drag and Drop.
Figure 10-3 Example of copy pointer augmented by an icon representing the file being copied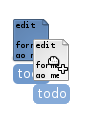
Only allow objects to be copied between applications, not moved. This avoids any confusion about which application's function reverses the operation.
-
Allow the user to cancel a drag and drop operation by all of these methods:
- pressing Esc before releasing the mouse button
- dropping the object back on its original location
- performing a query drag and selecting on the pop-up menu (see Section 10.1.3.1.2 ― Query Drag)
- dropping the object on an invalid drop target.
Allow the user to undo the effects a drag and drop operation by selecting .
Allow multiple objects to be dragged by Shift or Ctrl selecting them, then dragging any one of the selected objects.
Ensure that keyboard users can replicate all drag and drop actions using only menu items or keyboard shortcuts, such as (Ctrl+C) and (Ctrl+V).
When an item is being dragged within or into a scrollable window, support automatic scrolling of that window when the mouse is moved near its edges.
Pop up a menu when the user attemps to drop multiple objects on a target that only accepts single objects. On the menu, list all the objects being dragged, and a item.
- 10.1.3.1. Overriding drag and drop behavior
- 10.1.3.2. Mouse Pointers to Use for Drag and Drop
10.1.3.1. Overriding drag and drop behavior
- 10.1.3.1.1. Keyboard Modifiers
- 10.1.3.1.2. Query Drag
10.1.3.1.1. Keyboard Modifiers
Allow the user to force the behavior of a drag and drop operation by holding the Ctrl, Shift or both keys throughout. If the user changes modifier keys after they have started the drag, change the mouse pointer immediately and perform the new action when the mouse button is released.
| Modifier | Function |
|---|---|
| Ctrl | Copy |
| Shift | Move |
| Shift+Ctrl | Create link, shortcut or alias |
10.1.3.1.2. Query Drag
Allow the user to drag objects with the , or with Alt. Pop up a menu when the mouse button is released, offering the choice of , and (or whichever subset of those actions is available), and . Dragging in this way is known as query drag because it prompts the user before changing anything.
10.1.3.2. Mouse Pointers to Use for Drag and Drop
Use the default GTK drag and drop pointers for the standard transfer operations listed below. This consistency helps ensure the user will know exactly what to expect when they release the mouse button. If you have to design a pointer for a non-standard transfer action not listed here, follow the style of the standard pointers.
| Pointer Shape | Meaning |
|---|---|
|
|
Move selection. The dragged selection will be moved to the drop location, removing it from its previous location. |
|
|
Copy selection. The dragged selection will be copied to the drop location, leaving the original intact. |
|
|
Link selection. A link to the selection will be inserted at the drop location. How the link appears will be application-dependent, it may be a hyperlink, an icon, or a duplicate of the orignal selection, for example. |
|
|
Middle button or Alt-left button drag. A pop-up menu will be posted at the drop location to ask whether the user wants to Move, Copy, or Link the selection, or Cancel the operation. |
|
|
Can't drop here. Show this pointer while the mouse is over an area where the selection cannot be dropped. |
10.1.4. Mouse Interaction with Panel Applications (Applets)
All objects on the desktop must behave consistently. Despite their specialized nature, applets are no exception.
-
The unmodified left mouse button must be sufficient to operate all your applet's controls. Applets are meant to be simple enough that modified clicking, or clicking with other mouse buttons (except to pop up the applet's menu) is never required.
Clicking the right button anywhere within the applet's enclosing window must display either the popup menu for the whole applet, or the popup menu for the control under the mouse pointer. Do not have "dead areas" in your applet that do not respond to a right click.
-
Do not use the middle button for anything except dragging the applet to a new location. Middle-clicking and dragging anywhere within the applet window must move the applet, do not require a drag bar or similar device.
Ctrl+ drag should copy the applet, if moving to another panel; unmodified drag or Shift+ drag should move the applet, if moving to another panel. If moving within same panel, Ctrl=switched movement, Shift=push movement, Alt=free movement.